This post shows how to bulk insert records using Bulk API 2.0. Bulk API 2.0 provides a simple interface to quickly load large amounts of data into your Salesforce org and to perform bulk queries on your org data. It enables you to upload and upsert ( that is insert or update) large amounts of data into your Salesforce org. Bulk API 2.0 simplifies uploading large amounts of data by breaking the data into batches automatically.
Ingest Jobs
When ingest jobs are being processed , Salesforce Bulk API 2.0 automatically divides your job’s data into multiple batches to improve performance. Salesforce creates a separate batch for every 10,000 records in your job data, up to a daily maximum of 150,000,000 records.
Note: If the limit is exceeded while processing your job data, the remaining data will not be processed. The ingest job is marked as having failed.
Create a Bulk Job
For bulk inserting or updating of records, there is need to first create a job. In this post, to create a job to insert new records to make Bulk API 2.0 calls, Workbench (or any tool of choice) will be used because Bulk API is REST-based. The job specifies the type of object, such as Contact, that you’re loading, and the operation you’re performing, such as insert or delete. After creating the job, you will use the job ID in Bulk API 2.0 requests to close the job or abort (cancel) it.
Steps to Bulk Insert Records Using Bulk API 2.0
- Create a Job:
(1) To create a job, we submit a POST request to /jobs/ingest with the job’s properties in the request body
(2) Log in to your Trailhead Playground or Developer Org and navigate to Workbench.
(3) On the Workbench page, for Environment, select Production. For API Version, select the highest available number from the dropdown. Check the checkbox to select I agree to the terms of service.
(4) Click Login with Salesforce.
(5) In the top menu, select utilities | REST Explorer.
- Add the text /jobs/ingest to the default URI text to have: /services/data/v51.0//jobs/ingest
(where /jobs/ingest indicates that we’re accessing the resource for creating Bulk API jobs.) - For the method, select POST and for the request body, copy and paste this
{
"operation" : "insert",
"object" : "Contact",
"contentType" : "CSV",
"lineEnding" : "CRLF"
}Note: If you’re inserting an object other than Contact, replace “Contact” in the request body with your object name. When you’re using Workbench, set lineEnding to CRLF. For the Header, stay with default.
- Click Execute. The response should look like this
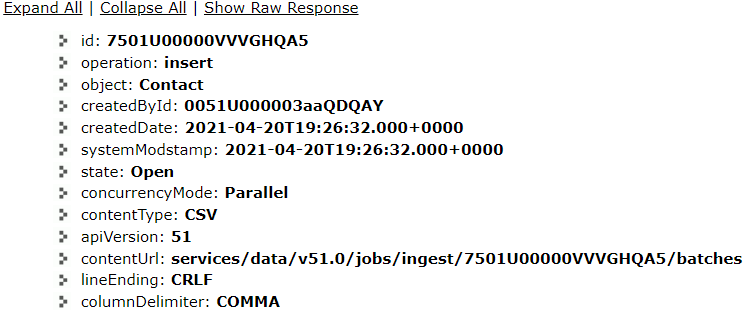
- Upload the CSV record data.
Change the method to PUT. For the URI, use the one provided in the contentUrl field.
For the request Body, paste this type of data in CSV format.
Important: If you copy the one below, first paste it in notepad before pasting it in Workbench because of the format used on this page
“Lastname"
"Sample Contact1"
"Sample Contact2"
"Sample Contact3"
"Sample Contact4"
"Sample Contact5"
"Sample Contact6"
"Sample Contact7"
"Sample Contact8"
The Lastname above is a required field for Contact object. If you are using another object other than Contact, remember to use the API name of the required field.
Change the Request Header to:
Content-Type: text/csv
Accept: application/json
Click Execute. If there is no error, you get a response like this
Raw Response
HTTP/1.1 201 Created
Date: Tue, 20 Apr 2021 20:47:00 GMT
Strict-Transport-Security: max-age=31536002; includeSubDomains
X-Content-Type-Options: nosniff
X-XSS-Protection: 1; mode=block
Content-Security-Policy: upgrade-insecure-requests
X-Robots-Tag: none
Cache-Control: no-cache,must-revalidate,max-age=0,no-store,private
Set-Cookie: BrowserId=jeTb8aIZEeupZNHODLxU0g; domain=.salesforce.com; path=/; expires=Wed, 20-Apr-2022 20:47:00 GMT; Max-Age=31536000
Sforce-Limit-Info: api-usage=5/15000
Transfer-Encoding: chunked
Note: For the Request Body, copy and paste the CSV data into Workbench’s Request Body text field because unlike Bulk API 2.0 Older Documentation where you can submit CSV data that does not in total exceed 150 MB in size.
- Close the Job
Once you are done submitting data:
1) Inform Salesforce that the job is ready for processing by closing the job
2) Change the URI text box with the following: /services/data/v51.0/jobs/ingest/ jobID. (For this post the jobID is 7501U00000VVVGHQA5)
3) Change the method to PATCH
4) For the Request Body, paste
{
“state” : “UploadComplete”
}
5) For the Request Header, paste this:
Content-Type: application/json; charset=UTF-8
Accept: application/json
- Click Execute to get a response like this

If you click Show Raw Response link, the first line show HTTP/1.1 200 ok
- Check the status of the job and results
1) For the URI, use: /services/data/v51.0/jobs/ingest/ jobID
3) Change the method to GET
4) For the Request Header, use the same as above - Click Execute button, you should get an output like this
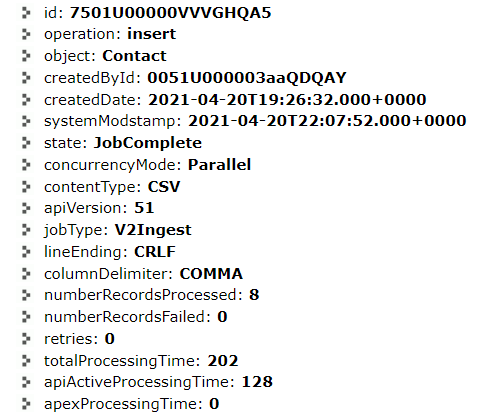
- Once a job has been completed and is in the JobComplete state as above (or Failed state), get the details of which job data records were processed successfully by using a GET request with the the details below:
URI:/services/data/v51.0/jobs/ingest/jobId/successfulResults/
(Don’t forget to change the jobId to the one you got with POST method)
Request Header:
Content-Type: application/json; charset=UTF-8
       Accept: text/csv
- Click Execute. The result of using this URI – /services/data/v51.0/jobs/ingest/7501U00000VVVGHQA5/successfulResults and executing it gives an output pasted below:

Reference
Bulk API 2.0 and Bulk API Developer Guide
Trailhead
:
Pingback: Bulk API 2.0 Query Delete -