Lightning custom Application events follow a traditional publish-subscribe model. They allow communication between components that are in separate parts of the application and have no direct containment relationship . When an application event is fired from an instance of a component, all components that provide a handler for the event are notified.
Application events are best used for something that should be handled at the application level, for example, navigating to a specific record.
Create an Application Event
To create a custom application event from Developer Console –
- Click File | New | select Lightning Event
- Name it as desired like customAppEvent just as the one I’m using in this post
- Click Submit button. It will give you a default code –

- Change the self-closing tag to open and close tags like the one below
<aura:event type=”APPLICATION”>
</aura:event>
Adding an attribute to the event gives
<aura:event type=”APPLICATION”>
<aura:attribute name=”message” type=”String”/>
</aura:event>
Create Component to fire the Event
Just like the component event, you need to use <aura:registerEvent> to declare that the component named appEventRegister may fire the application event -customAppEvent. The name attribute is required but not used for application events. The name attribute is only relevant for component events.
The button in the component contains an onclick browser event that is wired to the fireAppEvent action in the client-side controller. Clicking it invokes the action.
<aura:component >
     <aura:registerEvent name="appEvent" type="c:customAppEvent"/>

<h1>An Application Event Sample</h1>
    <lightning:button label="Fire an application event"
                      onclick="{!c.fireAppEvent}"/>
</aura:component>
To create the client-side controller for appEventRegister, click CONTROLLER in the sidebar of the component.
This client-side controller gets an instance of the event by calling $A.get(“e.c:customAppEvent”) using the event and not the name assigned when it was registered. The c here is the default namespace. The controller sets the message attribute of the event and fires the event.
({
    fireAppEvent : function(cmp, event) {
    // For application event, use the e.<namespace>:<event> syntax

       var appEvent = $A.get("e.c:customAppEvent");
        appEvent.setParams({"message" : "An application event has been fired."});
        appEvent.fire();
    }
})
Component that Handles the Event
Create a handler component – appEventHandler that handles the event customAppEvent using aura:handler tag.
It is very important to note that the handler for an application event won’t work if you set the name attribute in <aura:handler>
<aura:component >
  <aura:attribute name="msgFromEvent" type="String"/>
    <aura:attribute name="numEvents" type="Integer" default="0"/>
    <aura:attribute name="sourceName" type="String" />
    <aura:attribute name="phaseName" type="String" />

    <aura:handler event="c:customAppEvent" action="{!c.handleAppEvent}"/>

    <p>This is the message: {!v.msgFromEvent}</p>
    <p>Source of event: {!v.sourceName}</p>
    <p>Events phase: {!v.phaseName}</p>
    <p>Number of events: {!v.numEvents}</p>

</aura:component>
To retrieve the attribute value, call event.getParam() in the handler’s client-side controller – appEventHandlerController.js which retrieves the data sent in the event and uses it to update the msgFromEvent attribute in the handler component.
Check the handler component for some values that are being retrieved from the event.
({
	handleAppEvent : function(cmp, event) {
        var msg = event.getParam("message");
        //set the handler attributes based on event data
        cmp.set("v.msgFromEvent", msg);
        cmp.set("v.sourceName", event.getSource().getName());
        var numEvts = parseInt(cmp.get("v.numEvents")) + 1;
        cmp.set("v.numEvents", numEvts);
        cmp.set("v.phaseName", event.getPhase());
    }
})
Unlike the component event where the handler contains the notifier component, application event needs a container component – appEventContainer.cmp that contains the notifier and handler components.
<aura:component >
    <c:appEventRegister/>
    <c:appEventHandler/>
</aura:component>
To test this code, you can create appEventApp,app application and add the <c:appEventContainer /> to it as seen below.
<aura:application>
 <c:appEventContainer/>
</aura:application>
Click Preview on the sidebar. The result of clicking the button once is added below
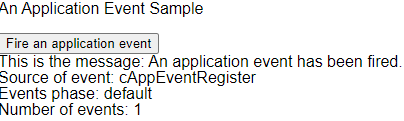
For a better User experience, click on Style in the sidebar to add some css codes to both the handler and notifier components.
.THIS {
  margin-left: 30px;
  margin-bottom: 10px;
}
Here is the output

Contact me if you have a question or need help with any aspect of this post