In this post, we are going to override standard action with picklist-fields component used in in my post Save Form With Multiple Picklist Fields in Lightning Component. The component – submitNewSchool.cmp which was based on multiple picklist fields will be used to override a standard action – New on the School object.
To enable a component to be used to override a standard action on the an object, you need to add the lightning:actionOverride interface to the component. It is possible to override the Delete, View, New, Edit, and Tab standard actions on most standard and all custom components.
Below is the submitNewSchool.cmp that implements the lightning:actionOverride interface along with other interfaces
<aura:component implements="lightning:actionOverride,flexipage:availableForRecordHome,force:hasRecordId" access="global">

    <aura:attribute name="picklistValues1" type="Object" />
    <aura:attribute name="picklistValues2" type="Object" />
    <aura:attribute name="schRec" type="School__c" />
    <aura:attribute name="modal1" type="String" default="New" />
    <force:recordData aura:id="schoolRecord"
                      recordId="{!v.recordId}"
                      targetFields="{!v.schRec}"
                      fields="Id, Name, District__c,Principal__c, Type__c,School_Category__c"
                      mode="EDIT" />

    <aura:handler name="init" value="{!this}" action="{!c.doInit}" />

   <c:SchoolPicklists sObjectName="School__c" fieldName="Type__c" picklistValues="{!v.picklistValues1}" />
    <c:SchoolPicklists sObjectName="School__c" fieldName="School_Category__c" picklistValues="{!v.picklistValues2}" />
    <div aura:id="editDialog" role="dialog" tabindex="-1" aria-labelledby="header43" class="slds-modal slds-fade-in-open">
        <div class="slds-modal__container">
                <div class="slds-modal__header">
                    <h2 class="slds-text-heading--medium"> Create {!v.modal1} Record</h2>
            </div>
            <div class="slds-modal__content slds-p-around--medium slds-grid slds-wrap ">
                <lightning:input aura:id="schName" name="schName" label="School Name" value="{!v.schRec.Name}" required="true" class="slds-size--1-of-1 slds-p-horizontal_x-small" />
              <lightning:input aura:id="schDistrict" name="schDistrict" label="District" value="{!v.schRec.District__c}" class="slds-size--1-of-2 slds-p-horizontal_x-small" />
                <lightning:input aura:id="schPrincipal" name="schPrincipal" label="Principal" value="{!v.schRec.Principal__c}" class="slds-size--1-of-2 slds-p-horizontal_x-small" />
                               <lightning:select aura:id="schType" name="schType" label="Type" value="{!v.schRec.Type__c}" class="slds-size--1-of-2 slds-p-horizontal_x-small">
                    <aura:iteration items="{!v.picklistValues1}" var="item">
                        <option value="{!item}">{!item}</option>
                    </aura:iteration>
                </lightning:select>
                  <lightning:select aura:id="schCategory" name="schCategory" label="Category" value="{!v.schRec.School_Category__c}" class="slds-size--1-of-2 slds-p-horizontal_x-small">
                    <aura:iteration items="{!v.picklistValues2}" var="item">
                        <option value="{!item}">{!item}</option>
                    </aura:iteration>
                </lightning:select>


            </div>
            <div class="slds-modal__footer">
                <lightning:button variant="neutral" onclick="{!c.handleCancel}" label="Cancel" />
                <lightning:button variant="brand" label="Submit" onclick="{!c.handleSaveRecord}" />
            </div>
        </div>
    </div>
    <div aura:id="overlay" class="slds-backdrop slds-backdrop--open"></div>
</aura:component>
Save the component after adding the interface to it.
Note: Both the submitNewSchoolController.js and submitNewSchoolHelper.js remain the same. You don’t need to add code to any of them.
To Set Up the Override
In your org:
- Click the setup cog
 and select Setup
 - Click Object Manager.
- Scroll down and click School or your object link.
- Under the Details, click Buttons, Links, and Actions.
- Click the drop-down icon
 next to New for this post or the action you want to override.
 - Select Edit
- This opens Override Properties page
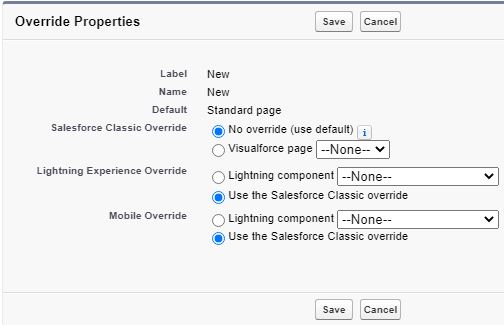
- Select Lightning Experience Override as Lightning Component and from the drop-down menu, select c:submitNewSchool or the name of the Lightning component to use as the action override because all the components that implement the lightning:actionOverride interface will appear in the drop-down

- Click Save
- Go back to the Sales app or the App where your object appears by clicking on
 , click Schools object.
 - Click on New, then the new page

Check h2 tag for the heading of this form – Create New Record.
Also notice the two picklist fields in the form. If required, you can add more fields to the form including picklist ones.
Fill out the form and click the Submit button, then you will see the success message:

Thank you !