Introduction
A many-to-many relationship allows each record of one object to be linked to multiple records from another object and vice versa. For example, you create a custom object that relates to another custom or standard object such that a record of the first object could be related to multiple records of the second object. Also, a record of the second object could be related to multiple records of the first. You can use master-detail relationships to model this many-to-many relationships between any two objects. To model a many-to-many relationship, use a junction object to connect the two objects you want to relate to each other.
Junction Object
A junction object is a custom object with two master-detail relationships, and it is the key to making a many-to-many relationship. With the use of a custom junction object, you can model a “many-to-many” relationship between two objects. In this post, I created a custom object called Candidate that relates to another custom object called Website through a custom junction object called “Job Posting”
To create the Many-to_Many Relationship
- Create the two custom objects – Candidate and Website and launch the custom tab wizard for each of them to create their tabs.
- Create the junction object – JobPosting without a tab
Name the object with a label that indicates its purpose – JobPosting.
For the Record Name field, use the auto-number data type. Enter the JOBPOST-{0000} for the Display format and 1 for the Starting number
Click Save. Do not launch the custom tab wizard because Junction objects do not need a tab - On the JobPosting object, create the first master-detail relationship field. In the custom field wizard:
- Choose Master-Detail Relationship as the field type.
- Select Position to relate to your junction object which now becomes the primary relationship.
- Click Next. For the Field label, enter Candidate.
- Click Next, Next, next and Save & New.
- For the Related List Label that will display on the page layout of the master object, do not accept the fault. Change this to use the name of the other master object in your many-to-many relationship. Change this to Website so that users can see a Website related list on the Candidate detail page
- On the JobPosting, create the second master-detail relationship. In the custom field wizard:
- Choose Master-Detail Relationship as the field type.
- Select Position to relate to your junction object which now becomes the primary relationship.
- Click Next. For the Field label, enter Website.
- Click Next, Next, Next and Save & New.
- For the Related List Label that will display on the page layout of the master object, do not accept the default. Change this to Candidate so users will see a Candidate related list on the Website detail page
Note: Use either (4) or (5) option above depending on Use case. If option (4) is used, users see the custom junction object in the related list.
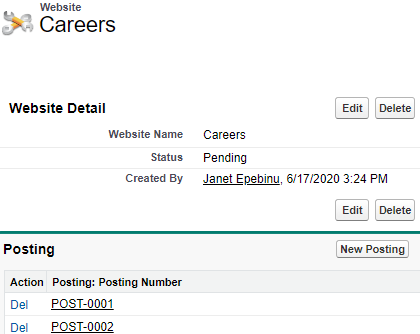
Below is the image of Website page if option (5) is used
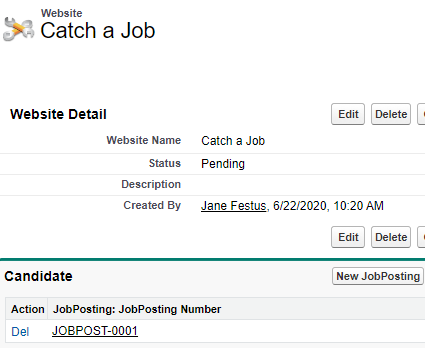
For option (4),
Modify the Page Layouts
For many-many relationship in Salesforce, there are customization that you can do to create a seamless look and feel ranging from changing the name of the junction object related list on to the primary relationship to the secondary and vice versa . For this post, the fields that display in the junction object related list on each master object page layout will be customized.
To customize these fields
From Setup in Lightning Experience,, click Object Manager.
Click Candidate, then Page Layouts.
Click Down arrow next to Candidate Layout and select Edit
Scroll down to the Job Postings related list, and click the Wrench icon
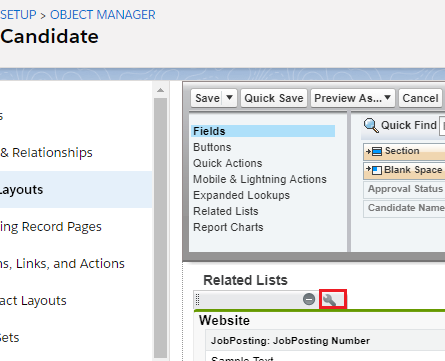
From the Available Fields section, select
Website: Status
Website: Description
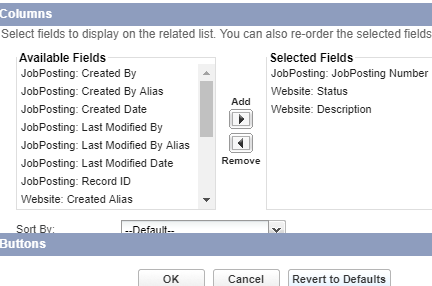
Click Add.
Click Ok and then Save
Now, add fields to the Candidate related list on the Website page layout.
From Setup, click Object Manager.
Click Website, then Page Layouts.
Click Down arrow next to Website Layout and select Edit.
Scroll down to the Job Postings related list and click Wrench icon in the header to edit it. 
From the Available Fields section, select
Candidate: Approval Status
Candidate: Email
Click Add.
Click Ok and then Save
Primary and Secondary Relationships
Primary relationship affects the following for the junction object records:
- Look and feel: The junction object’s detail and edit pages use the color and any associated icon of the primary master object.
- Record ownership: The junction object records inherit the value of the Owner field from their associated primary master record. Because objects on the detail side of a relationship do not have a visible Owner field, this is only relevant if you later delete both master-detail relationships on your junction object.
- Division: If your organization uses divisions to segment data, the junction object records inherit their division from their associated primary master record. Similar to the record ownership, this is only relevant if you later delete both master-detail relationships.
For the secondary relationship, If you delete the primary master-detail relationship or convert it to a lookup relationship, the secondary master object becomes primary
For more information on Many-to-Many relationship in Salesforce, check the Resources section
Resources
Salesforce Help
Trailhead